You know how frustrating it is when your aircon runs all day but barely cools the room.
That 85% humidity in Singapore makes professional aircon servicing essential for any home or business. We see this issue constantly, and the root cause is usually severe dirt buildup hidden deep inside the unit.
Back in 2007, when Brian founded Cool Earth Aircon Services as a one-man operation, he noticed customers were paying for cleanings without knowing what actually happened. This lack of transparency makes it hard to judge whether you are receiving a thorough job or just a superficial spray.
We created this step-by-step guide to explain exactly what happens during an aircon chemical wash. Knowing what to expect helps you hold any provider accountable for doing a proper job.
What Happens During an Aircon Chemical Wash? A Step-by-Step Guide
Before the Technician Arrives
A professional chemical wash does not require much preparation on your part. A few simple steps help the appointment go smoothly. We recommend doing the following before the team knocks on your door:
- Clear the immediate area: Moving furniture or valuables away from the indoor unit provides safe access. Our technicians place protective sheets, but an empty space speeds up the process.
- Switch off the unit early: Turning the system off 10 minutes prior allows the evaporator coil to warm up. This slight temperature increase softens hardened dirt and makes the alkaline chemical cleaner much more effective.
- Document specific problems: Jot down any ongoing issues like weak cooling, water leaks, or musty odours. Telling the technician about these symptoms helps them identify specific mould colonies, such as Aspergillus, which thrive in Singapore’s tropical climate.
Step 1: Initial Inspection (5 Minutes)
Every proper service begins with a visual and functional assessment. We check the overall condition of the unit, inspect the filters, and look for visible mould on the coils. Testing the unit briefly allows the technician to assess cooling performance and an airflow baseline before the wash.
Comparing this baseline to the final results confirms the effectiveness of the cleaning. This initial assessment tells the team exactly what needs the most attention.
Finding dark spots on the fan often indicates a buildup of Penicillium mould, which requires targeted chemical application. We also look for oil stains around pipe joints, as these indicate a refrigerant leak. Spotting a lack of R32 or R410A refrigerant means that issue must be flagged and resolved separately from the cleaning.
Step 2: Preparation and Protection (5 Minutes)
Protecting your home and the electrical components of the unit is a critical priority. We secure the workspace completely before applying any liquids. Skipping this step often results in expensive water damage to your walls or flooring.
Our preparation process includes several strict safeguards:
- Applying protective sheeting: Heavy-duty plastic drop cloths are laid on the floor directly beneath the workspace.
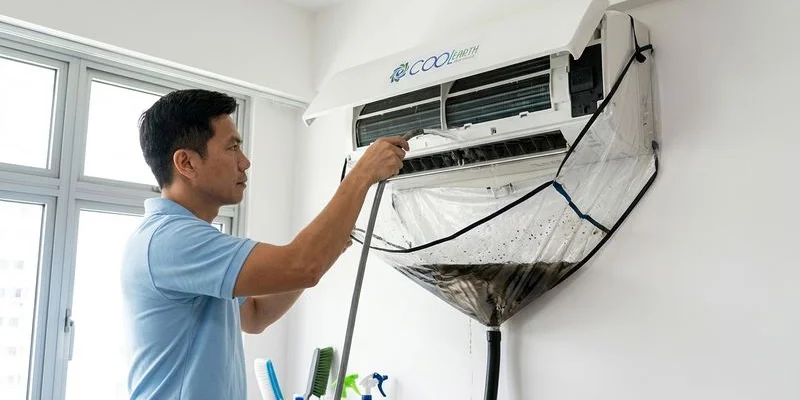
- Installing the chemical bib: A specialised waterproof polyurethane funnel is strapped around the indoor unit. This essential tool catches all dirty runoff and directs it safely into a collection bucket.
- Securing the electronics: The Printed Circuit Board (PCB) and wiring connections are carefully wrapped or temporarily disconnected.
- Removing exterior parts: The front panel and primary air filters are taken off and set aside for an independent washing.
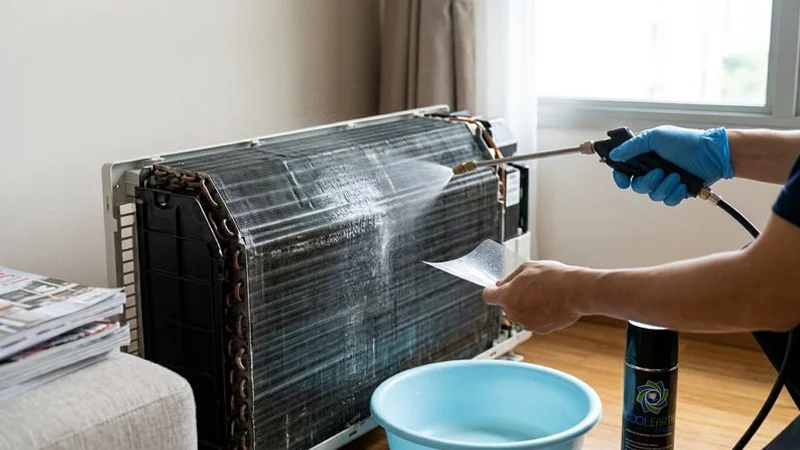
Step 3: Chemical Application to Evaporator Coils (10 to 15 Minutes)
This stage is the absolute core of the deep cleaning process. We use a pressurised pump sprayer to apply a professional-grade, alkaline-based cleaning solution directly onto the aluminum evaporator coils. Brands used in Singapore, like Cleanbee or Coil Shine, are formulated specifically for HVAC systems.
These alkaline solutions dissolve stubborn grease without causing corrosive damage to the delicate metal fins. The chemical requires sufficient time to penetrate the layers of grime. We focus the application on achieving two primary objectives:
- Breaking down biofilm: We allow the foaming solution to sit on the coils for 10 to 15 minutes to destroy harmful contaminants like Stachybotrys chartarum, commonly known as black mould.
- Visual confirmation: You will usually notice the foam changing from white to a dark brown tint as it successfully reacts with the hidden dirt.
During this brief waiting period, the technician shifts focus to the removed components. The front plastic panel and air filters are scrubbed with the same alkaline solution and rinsed thoroughly with clean water.
Step 4: Rinsing the Coils (5 to 10 Minutes)
Flushing the dissolved grime out of the system is the next crucial action. We use a portable pressure washer, carefully calibrated to around 40 to 60 PSI, to spray clean water through the coil fins. This specific pressure ensures heavy dirt is pushed out without bending the fragile aluminum components.
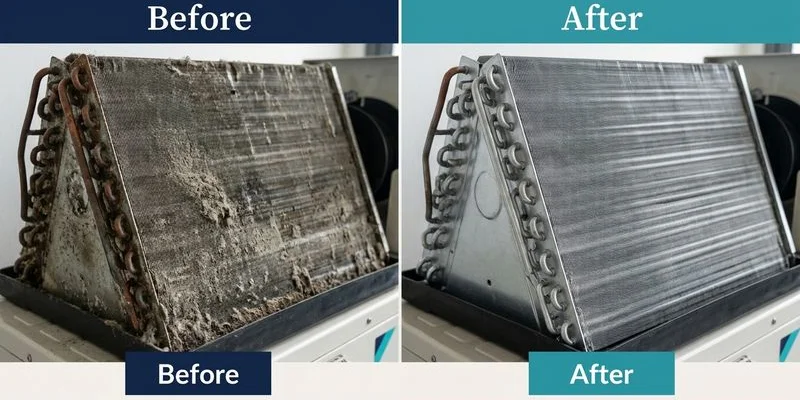
The pressurised water forces the loosened debris into the protective bib and down into the collection bucket. The appearance of this runoff water is often quite shocking to property owners.
Units that look perfectly clean on the outside regularly produce thick, black water filled with oxidised dust and mycotoxins.
This hidden buildup severely restricts heat transfer and forces your compressor to work overtime. We continue the rinsing process until the water flows completely clear. Finding severe blockages might require a second targeted chemical application before the final rinse.
Step 5: Blower Wheel Cleaning (10 Minutes)
The blower wheel is the long, cylindrical cross-flow fan that pushes chilled air into your room. Its dozens of tightly spaced fins easily trap wet dust and heavy grease, especially in HDB units located near open kitchens. We clean this component thoroughly in place during a standard chemical wash.
Our technicians spray the alkaline cleaner deep into the barrel and rotate the cylinder manually to coat every single fin. Leaving this wheel dirty restricts airflow heavily and leads to the sour, musty smells commonly experienced in older units. A high-pressure rinse follows the chemical soak to blast away the loosened sludge.
Sometimes, standard in-situ cleaning cannot clear out a severely choked fan. Upgrading to a full chemical overhaul is often the best next step if the buildup is rock-solid. This intensive service involves physically extracting the wheel from the chassis for an uncompromised deep clean.
Step 6: Drain Pan and Condensate Line Flushing (5 Minutes)
The drain pan sits right below the coils to catch normal condensation. This shallow tray constantly holds stagnant water, making it a prime breeding ground for algae and bacterial slime. We manually wipe down the accessible sections of this pan with an antibacterial agent to stop this biological growth.
Clearing the attached condensate drainage pipe is just as important. Sludge from the drain pan eventually flows into this pipe and creates stubborn jelly-like blockages.
Water leaking from the indoor unit is the number one aircon complaint in Singapore, and a blocked condensate line is almost always the culprit. Our team flushes a dedicated cleaning solution through the pipe to dissolve these organic clogs. Using a specialized wet vacuum or hand pump creates positive pressure, forcing out any remaining debris and preventing future leaks.
Step 7: Reassembly and Testing (10 Minutes)
Putting the unit back together correctly guarantees safe operation. We carefully reverse the dismantling process once all the internal components are completely spotless. The protective bib is detached, the clean filters are slotted back in, and the dry front panel is secured.
Restoring the electrical connections allows us to power the unit on for a mandatory functional test. We run the aircon for at least 5 minutes to verify that everything operates flawlessly.
During this testing phase, the technician evaluates several specific metrics:
- Airflow strength: The volume of air pushing through the vents should feel noticeably stronger.
- Temperature drop: A digital thermometer confirms the output is operating within the healthy range of 8 to 12 degrees Celsius.
- Drainage clearance: Water must flow smoothly through the condensate line without pooling in the pan.
- Acoustic levels: Listening for grinding or rattling noises helps identify worn motor bearings.
- Air quality: The chemical wash should successfully eliminate all traces of damp, musty odours.
Total Time and What to Expect
A thorough chemical wash requires a dedicated time investment to do properly. Budgeting about 30 to 45 minutes per individual unit is standard for a professional service. You should set aside roughly 1.5 to 2 hours if you are servicing a typical 3-unit System 3 setup in an HDB flat or condominium.
The current market rate for an aircon chemical wash in Singapore generally ranges from $80 to $120 for a standard wall-mounted split unit. Paying this maintenance fee often results in immediate financial returns. Your monthly electricity consumption can drop by up to 20% because the clean system transfers heat efficiently and reaches your target temperature much faster.
You will experience a massive improvement in cooling speed the moment the service is finished. Noticing a faint, sterile smell for the first hour of operation is completely normal. This minor scent fades rapidly as the final traces of the cleaning solution evaporate off the cold coils.
Typical Aircon Chemical Wash Pricing in Singapore (2026)
Understanding the standard market rates helps you budget for your annual maintenance. We compiled the average costs based on the type of service required:
| Service Type | Average Price Range (Per Unit) | Best Suited For |
|---|---|---|
| Standard Chemical Wash (Wall-Mounted) | $80 to $120 | Routine deep cleaning, minor odours |
| Chemical Wash (Cassette / Ceiling) | $120 to $150 | Commercial offices, large living rooms |
| Full Chemical Overhaul (Dismantled) | $150 to $250 | Severe blockages, chronic water leaks |
How to Tell If Your Chemical Wash Was Done Properly
Verifying the quality of the work protects your investment. We encourage homeowners to monitor the process, especially when hiring a new contractor for the first time. A genuine deep clean is easy to identify if you know what visual cues to look for.
Check for these specific indicators of a professional job:
- Equipment used: The technician absolutely must install a proper drainage bib before spraying.
- Runoff evidence: A successful wash always flushes out a significant amount of dark, dirty water.
- Time invested: Spending less than 25 minutes on a single unit is a major red flag for skipped steps.
- Temperature check: The room should feel noticeably colder within minutes of turning the system back on.
- Final validation: The provider should run a complete functional test and show you the results before packing up.
Companies claiming to perform a chemical wash in 10 minutes are usually just spraying a cheap foam and wiping the plastic cover. You should never hesitate to ask questions and demand complete transparency from the person servicing your home. Providing verified proof of work is the bare minimum expectation for any reputable service provider.
Ignoring a dirty air conditioner directly leads to higher power bills and unhealthy indoor air.
We highly recommend scheduling a proper cleaning if your system is struggling to keep up with the afternoon heat. Now that you know exactly what happens during an aircon chemical wash, you can make an informed decision for your home.
Ready to book your service? Contact Cool Earth Aircon for transparent pricing and professional service backed by our 90-day workmanship warranty.

About the Author
Brian
Founder & Lead Technician
Brian founded Cool Earth Aircon in 2007 after completing his technical apprenticeship. With 18 years of hands-on experience servicing aircon systems across Singapore, he leads a team of certified technicians committed to transparent, quality work.